Posted by John
Most of Mysticeti’s interior lighting is fluorescent, with several being Alpenglow fixtures. Many of these can be switched between white light and red light to preserve night vision. Some can also be switched between high and low power.
I’ve always wanted to change everything over to LED lighting. Mainly for power savings, but also to eliminate the annoyances of fluorescent lamps. For one thing, the CFL tubes come on dim and take several minutes to warm up to full brightness. This is frustrating if you want light for just a few seconds, maybe to find something. Also, spare 12 volt fluorescent tubes of the proper size and shape are not that easy to find, especially if they have been dipped in some sort of red coating in order to produce red light. And most annoying to me is that the ballast goes bad. This may be just me, but over the last few years the ballasts in five cheap shop fixtures in our garage at home have gone bad. The box of replacement fluorescent tubes we bought still remains unused, and the money spent on replacement ballasts totals at least as much as that spent on the original fixtures. Key word here, I suppose, is cheap.
Years ago, when the ballast died in two of Mysticeti’s generic fluorescent light fixtures, we replaced them with completely new fluorescent fixtures from Fisheries (marine store in Seattle), for a lot more money than I wanted to spend. And when the ballast died in one of the Alpenglow fixtures, we just stopped using it because the process and expense of fixing it was more involved than I wanted to take on at the time, especially since what I really wanted was a good LED replacement of equivalent brightness.
The Alpenglow company in Montana now sells LED versions of the old CFL fixtures. They also sell LED upgrades, which replace the entire insides, including backplate and switches, with new. And they also sell replacement ballasts which you can wire in yourself. With a recent price for the ballast of $34, and a full high/low power, red/white LED conversion (with labor) being about $100, repairs or upgrades are not cheap. Upgrading all of our existing Alpenglows would be at least $1,000. Even a ballast replacement at a remote location would not be easy.
I’ve seen people using strings of LED’s that come on a tape reel with a self-adhesive backing. They’re available in several different colors including red, and are inexpensive.
We bought some from Amazon for only a few dollars each. A 300 LED, 5 meter string was $6.99. I’ve also seen them in discount parts and surplus catalogs for very low cost. Originally, we bought them to experiment with and see where we might have a use. Since the boat was tied to the dock for the dark and wet winter months, and I had some time to kill, I wondered what kind of LED upgrade I could do on my own.

The LED’s are wired in a series/parallel combination every three LED’s.

Series/parallel means that three LED’s are wired in series, along with a current-limiting resistor sized for 12 volts, and then the pattern repeats, with each three-LED-plus-resistor module wired in parallel. The wiring is accomplished through the use of a thin copper foil printed on a flexible strip which is the “tape.” Between each module the copper foil widens into connection pads, marked with a + and -. These pads can be cut through the middle with a scissors to form attachment points at each end of whatever length is desired. The back of the tape is coated with an adhesive material protected by a peel-off paper.
One of the white LED reels we bought is marked “waterproof.” Waterproof means different things to different people. Unless there is an associated IP rating, such as IP67, you really don’t know what the waterproof claim means.
What I do know it means is that the LED side of the tape is coated with a thick, rubbery, transparent coating which must be carefully cut away from the copper pads if you plan on cutting the tape into smaller sections.
Once the pads are exposed from the coating (not an issue on the non-waterproof version), they can be soldered to. This is a somewhat delicate task. Experience suggests that the very thin copper foil could be destroyed by too much soldering heat. The LED reels we bought came with a few extra edge connectors that slide onto the end of the tape and make contact with the pads. There weren’t enough connectors included for my use. I didn’t try using them.
Since the Alpenglow light fixtures seem to carry a certain amount of value (perhaps less so, now that LED’s are becoming the norm), my first rule of conversion was to preserve what I had. In other words, I was OK with taking them apart for now, but I wanted the option of being able to restore them back to original condition later.
The first unknown was how many individual LED’s would be required to match the full light output of the fluorescent tube. The next question was how much power did the Alpenglows consume before the conversion, so I could compare with what they consumed after. The power question was the easiest to answer. I put an ammeter in series with the power supply and measured the current directly. Here’s what I measured:
High power white = 0.840 Amp
Low power white = 0.430 Amp
High power red = 0.671 Amp
Low power red = 0.371 Amp
The question of light output was more difficult. I remembered that my dad had a photographic light meter when I was kid. Maybe I could use something like that to measure light output from the fixture. While wondering if that thing was still around, if I had it and where it might be if I did, I started thinking about the old photocells of mine that I’d come across while getting rid of stuff recently. And by “photocell” I mean a light-sensitive resistor which changes resistance in accordance with the amount of light striking it. The kind of thing used to automatically turn on lights at dusk.
I set up the photocell a fixed distance above the Alpenglow fixture and connected it to an ohmmeter.

I obtained the following readings:
High power white = 735 ohms
Low power white = 1,230 ohms
High power red = 3,800 ohms
Low power red = 6,250 ohms
I could make the same measurement with the LED version to see how close the light output was to the original. Good idea maybe, but in reality I didn’t control all the other variables very well—like ambient light. But it did give me a rough idea, since I had no idea otherwise of how many LED’s to use to produce equivalent light.
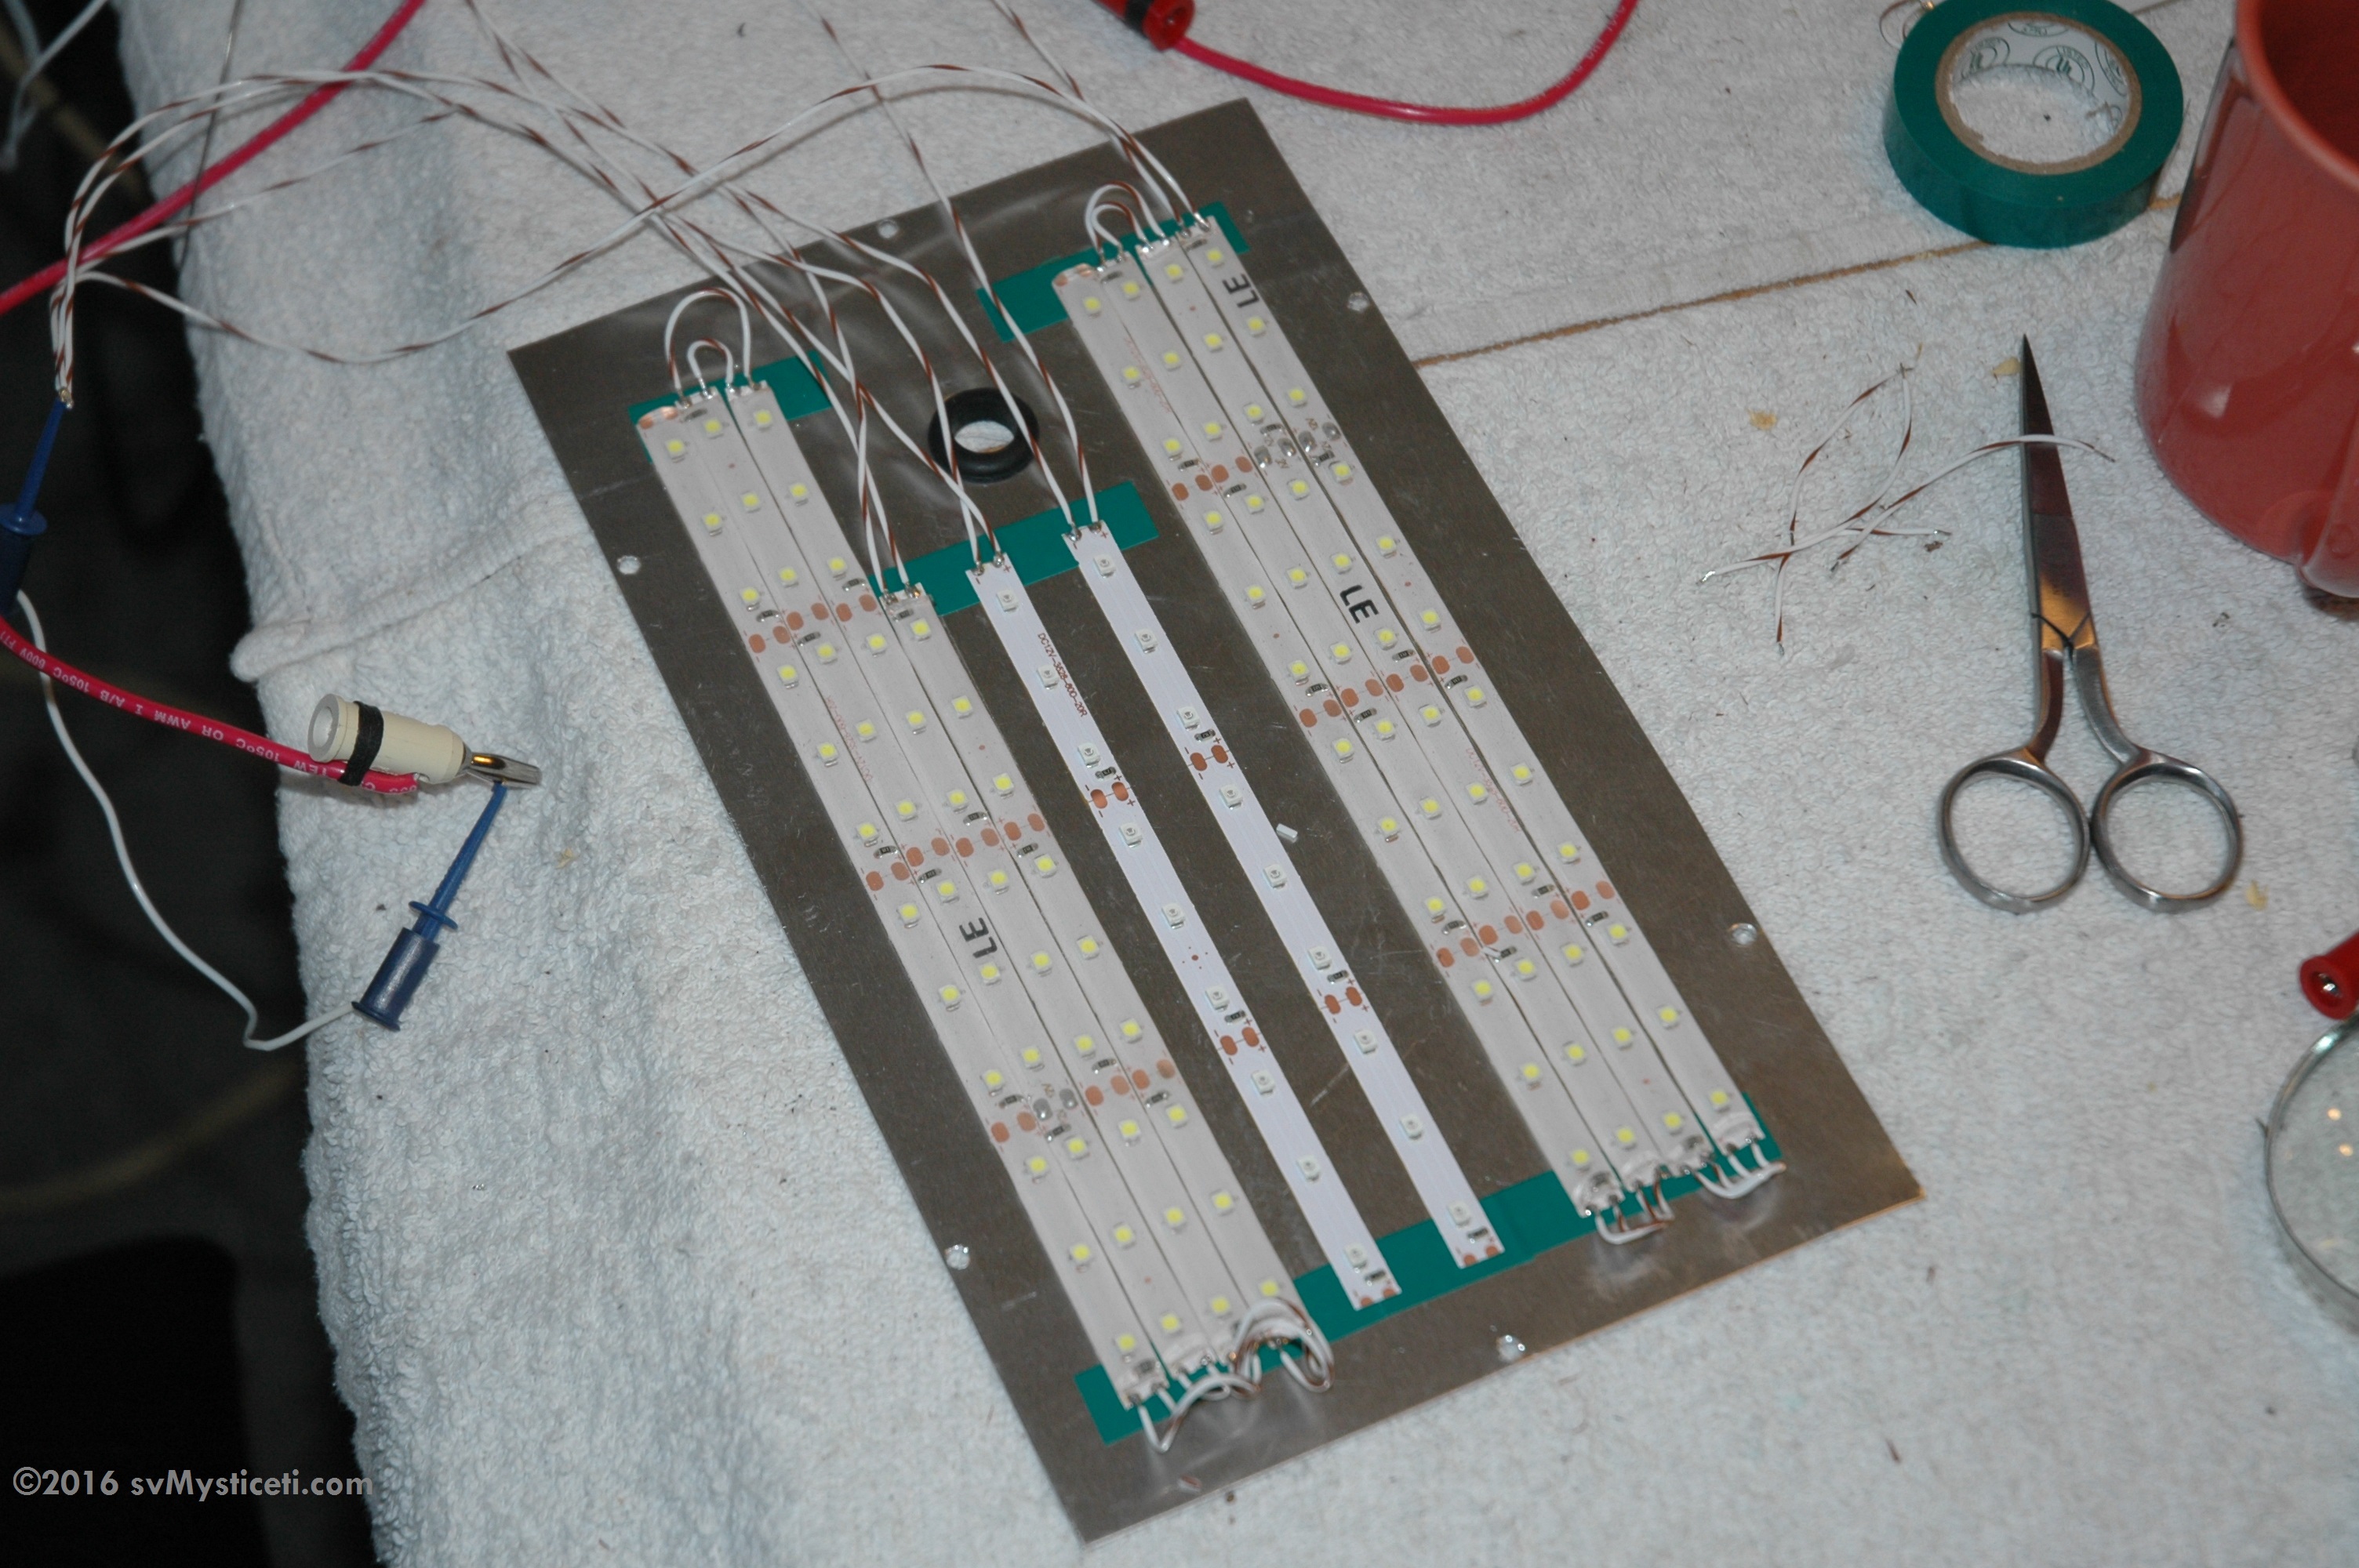
The insides of our older Alpenglow fixtures cannot be removed without cutting the wires to the switches. My plan was to create a new backplate using a piece of aluminum, and stick the LED’s directly to it using their adhesive backing. I would reuse the same Alpenglow switches, retaining the same functions as before so there would be no difference in operation between the converted and non-converted fixtures.

I experimented with the LED’s using my light measuring technique, then organized them into two white sections and two red sections. The low power setting would turn on one section, high power would turn on both. The red/white switch would determine whether red or white sections were powered.

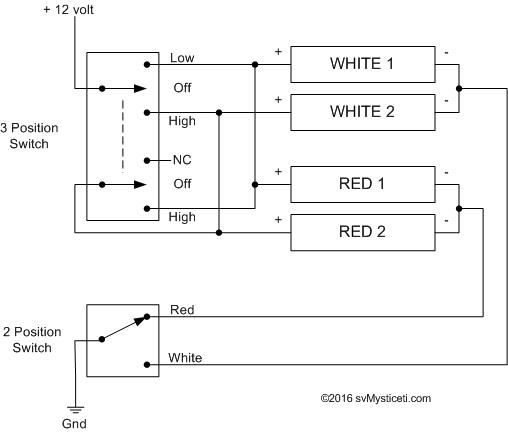
I rewired the existing switches as shown in the schematic diagram below. One of the switches is three-position, double-pole with the center position being off. The other switch is two position, either red or white. Double pole means that two sets of contacts change position when the switch is pressed.
I was somewhat surprised with the result. I did not end up saving any power with the white lights. Too many LED’s? My crude attempt at comparing light output between the fluorescent tube and the LED strip probably had some flaws (lack of ambient light control, for one). I should’ve taken two fixtures off the boat and converted one, using the other for side-by-side comparisons. Next time, maybe.
What I did get, however, is a very bright, instant-on (no warm up required) white light with no ballast to go bad or tubes to burn out.
The red light fared much better (far fewer LED’s were used), producing a significant power savings. In the low power setting, it uses 0.081 Amp, compared to 0.371 for the CFL. Two or three of these could be left on all night with virtually no battery drain and enough light to see while moving about the boat.
Perhaps the best part is, we don’t have to carry any spare fluorescent tubes, and the ballast isn’t going to fail unexpectedly. The conversion of one fixture was maybe $12, with $8 of that going for the aluminum sheet from the hardware store. McMaster-Carr sells some 0.032 inch thick fiberglass sheet that I’m going to try next time. It can possibly be cut with a hefty scissors, is less cost than the single-quantity aluminum sheet, and the soldered connections won’t short out if they come in contact with it.

Putting the finished fixture back on the boat and trying it out at night revealed that the new high power setting is noticeably brighter than the old CFL high power setting. To my eye, the LED low power setting is approximately equivalent in light to the CFL high setting. So, perhaps I did achieve a power savings after all.